Thread the needle pose is the perfect post-work stretch
Welcome to our weekly Move of the Week series. Every Monday, we’ll be sharing with you one of our favourite exercises – how to do them, what muscles they work and why they should be a regular part of your workout regime. This week: thread the needle.
Have you ever caught sight of your posture mid-working day? Maybe your shoulders were hunched to your ears or your back was rounded over, and you suddenly realised why you feel so stiff and sore in the upper body after eight hours at the desk.
Working on your posture is important, but to ease the immediate discomfort you can stretch out the tight muscles both before and after work with thread the needle pose.
You may also like
Move of the week: add butterfly crunches to your ab workout for an advanced core burn
What is thread the needle pose?
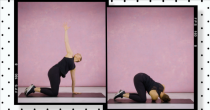
Thread the needle pose begins in a tabletop position, before threading one arm under the opposite armpit.
This exercise is great because:
Improves upper body mobility: improve range of motion in the spine, back and shoulders with this dynamic move.
Reduces pain: by loosening tight muscles in the back, side and front of the upper body.
Can be done any time: it’s great to create space before the work day or workout as well as to stretch out afterwards.
What muscles are worked in thread the needle?
This move mainly targets the upper body, including:
- Rear delts (back of shoulders)
- Lateral delts (side of shoulders)
- Back muscles
- Lats (at the side of the body)
- Pecs (chest)
- Obliques
You may also like
Move of the week: build core stability with plank step in and outs
How to do thread the needle
- Begin in a tabletop position with your wrists directly underneath your shoulders and hips directly in line with your knees. Engage your core by pulling your belly button to your spine.
- Take your right hand off the mat and lift it to the ceiling, twisting through your chest but keeping your hips square (think about off setting the pull to the right by pushing them to the left).
- Bring your right arm back down and thread it underneath your left arm until your right shoulder comes towards the floor. Turn your head to the left to let your cheek rest on the floor.
- Again, keep your hips square by thinking about pushing them towards the right as your upper body twists to the left.
- Hold for a few seconds then repeat on the other side.
For more exercise tips, sign up to the Strong Women Training Club.
Images: Stylist
Source: Read Full Article