
The walk yourself fit technique

I believe your fitness should be determined by how you navigate each 24 hours: that is, by fitting more movement into your day rather than struggling to spend a few hours in the gym each week. This explains why I’m passionate about walking.
Walking is a sociable and environmentally sound activity. Whether you’re looking for vigorous exercise or a more gentle workout, walking is easily integrated into your daily routine. You can take it up at any stage of your life, and – provided you walk with the right technique at the right pace – it can significantly improve your health and fitness levels.
First, let’s consider technique. If you don’t get to grips with the correct technique then it doesn’t matter how many steps you take, you won’t feel or see the benefits of regular walking. The technique takes time to learn and needs to be practised to ensure that you are using it correctly and safely.
Try building up your technique gradually by practising each skill separately first. In your first session, practise each skill for about five minutes in the order set out over the following pages. Once you’re confident you’ve mastered each technique, put them all together. Your new walking style should look fast, smooth and fluid and feel dynamic, energetic and effective.
1. Feet and ankles
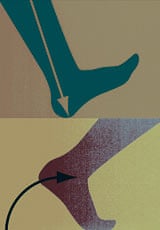
The feet and ankles are the foundation of this technique and it’s vital that you get them right before moving on. Most of us don’t stretch out our ankles to their full extent when we walk. The aim of this technique is to hit the ground with the pad of your heel, roll through the foot and then push off with your toes, feeling your ankle open out as if you were pointing your toes. The push-off and open ankle are the key to success – feel your toes spreading out in your shoes and really focus on pushing off through them followed by opening your ankle. This will help engage the correct muscles (namely your glutes and hamstrings) to propel you forwards smoothly and efficiently. A good mantra to repeat to yourself is “absorb and show”: absorb the ground with your foot and then show the soles of your shoes to the person behind you by really pushing off with your toes.
2. Pelvis and hips
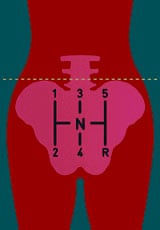
The aim here is to adjust your pelvis into a neutral position to help prevent back and hip pain while walking. A common mistake when trying to achieve this is to extensively tense the stomach muscles, but this creates compression in the lower back and reduces mobility in the spine. Instead, engage your abdominal muscles to about 75% so that your lower back remains soft and supple. Try to ensure that your glutes are not tensed either. Concentrate on keeping your hips level as you walk. Imagine you have a cup of water balanced on each hip. As you walk, focus on not spilling the water. Swinging or tilting your hips can cause back or hip pain and reduces forward propulsion.
3. Arms and hands
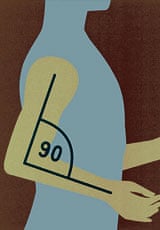
Your arms act as your accelerators and good arm movement encourages mobility and natural rotation in the spine. The arm movement in this technique not only helps increase your speed, but will also tone and strengthen your back muscles, while whittling away your waistline. Bend your elbows to about 90 degrees and focus on making a long backward swing and a short forward swing. The backward movement helps propel you forward and opens up your chest and shoulders, enabling you to breathe more easily. Keep your hands relaxed as you walk. Try not to clench your fists – imagine that you’re holding a crisp between your thumb and forefinger. When your hands swing forward, they should come slightly across your body with each stride, but not right up towards your chin.
4. Head and neck
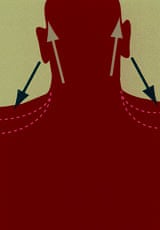
A common mistake when walking at speed is to allow your shoulders to creep up towards your ears, creating tension in your neck, shoulders and back. You can combat this by looking up and forward and focusing on relaxing your shoulders by increasing the space between your shoulders and ears. Like the backward movement of your elbows, this also helps to open up your chest.
And finally …
Overriding your existing walk takes practice and time, so be patient: when implemented correctly, the results are impressive. As you walk, try not to lose focus on your technique. Every few minutes, run through each of the four techniques in your mind. Start with your feet and ankles, and work your way upwards to your head and neck, making sure you keep the correct postural position throughout the entire duration of your walk.
Watch Joanna demonstrate her walking technique here
Key points to remember
Feet and ankles
• Absorb the ground by rolling through the whole foot
• Feel the toes spread, and push off through them
• Open your ankle and show the entire sole of your foot to the person behind you
Pelvis and hips
• Keep abdominals lightly engaged, but lower back and gluteals relaxed
• Keep hips level on each stride
Arms and hands
• Swing your bent elbows backwards further than you swing them forwards
• Keep hands relaxed
Head and neck
• Increase the distance between your ears and shoulders
Source: Read Full Article

